VirtualBox:CentOS 6.6 Install
■仮想マシンの作成
CentOS 6.6 32bit を最小構成でVirtualBoxの仮想マシンにインストールする。
CentOS Project
https://wiki.centos.org/Download
上記のDownloadページからVersion6.6のi386版を選択し、Actual Country - から以下のCentOS6.6 i386版をダウンロードした。
http://ftp-srv2.kddilabs.jp/Linux/packages/CentOS/6.6/isos/i386/CentOS-6.6-i386-bin-DVD1.iso
CentOSの公式なハードウェア要件は、以下のページを参照
https://wiki.centos.org/About/Product
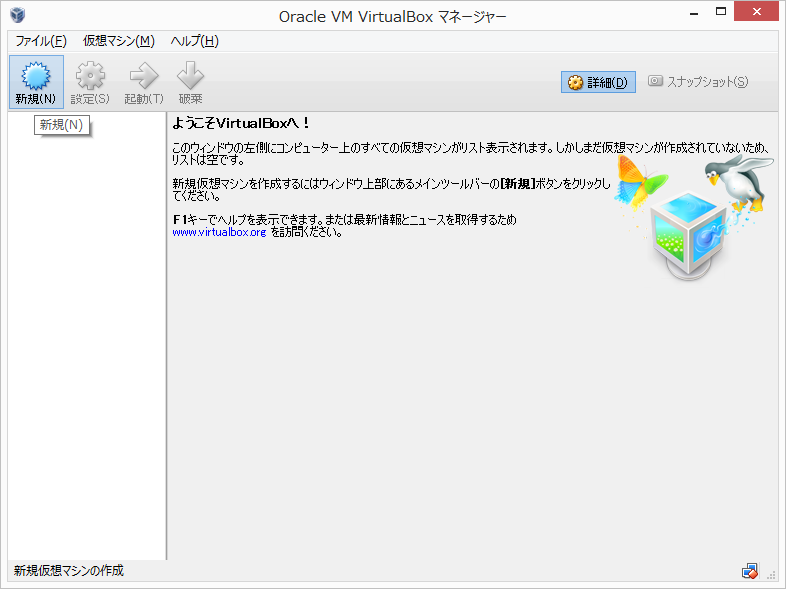
VirtualBoxを起動し、左上の新規(N)アイコンをクリック。
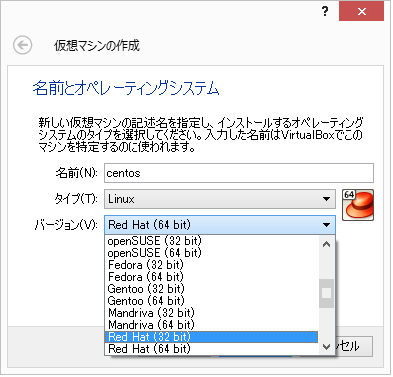
名前(N):centosとする。
自動的にタイプ(T):Linux、バージョン(V):Red Hat(64 Bit) が選択されるので バージョンを Red Hat (32 bit) に変更。
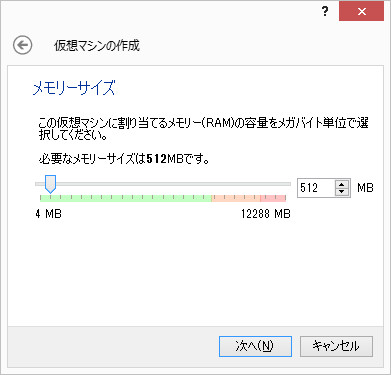
メモリーサイズ:512MB指定。(Default)
(公式最小メモリサイズは1CPUあたりGUI使用時512MB、CUI使用時392MB)
※ 搭載メモリの半分以上を指定するとVirtualBoxに注意される。
512MBの場合、テキストモードインストールとなり、インストールパッケージやパーティションレイアウトの選択ができない。
4.既知の問題点
※ 「652MB 以下で自動的にテキストモードが使用される」とあるが、今回の仮想環境上でのテストでは626MBまではGUIインストールが可能だった。
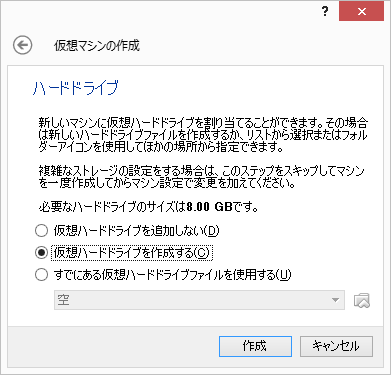
ハードドライブ:仮想ハードドライブを作成する(C) を選択。(Default)
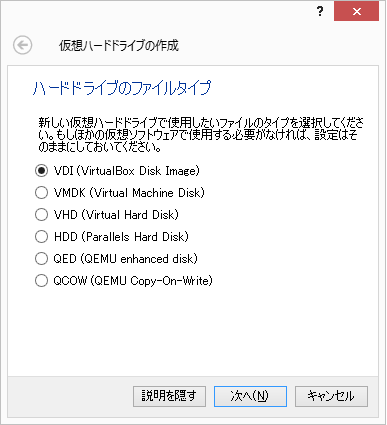
ハードドライブのファイルタイプ:VDI (VirtualBox Disk Image)を指定。(Default)

物理ハードドライブにあるストレージ:可変サイズ(D)指定。(Default)
・可変サイズ:使った分だけ物理ディスクから容量確保 (省スペース優先)
・固定サイズ:ディスク作成時に全容量を一度に確保 (速度優先)
※ 実ディスク容量が少ない為可変サイズを指定したが、環境に応じでどちらを選択しても構わない。
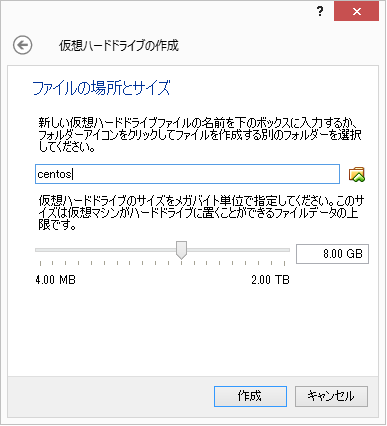
ファイルサイズ(S):標準の8GBを指定。(公式最小ディスクサイズ:1GB、推奨5GB)
今回のテストではインストール直後、約1.03GBのディスクを使用していた。
※ 仮想ハードドライブの容量は一つ前の設定で可変サイズを指定していれば使用した分のみ確保され、インストール後にここでの設定以上に拡大は可能。
■CentOSインストール
インストールディスクを仮想マシンに挿入する。

「Oracle VM VirtualBox マネージャー」ウィンドウの左側から作成したcentosを選択し、設定(S)アイコンをクリック。
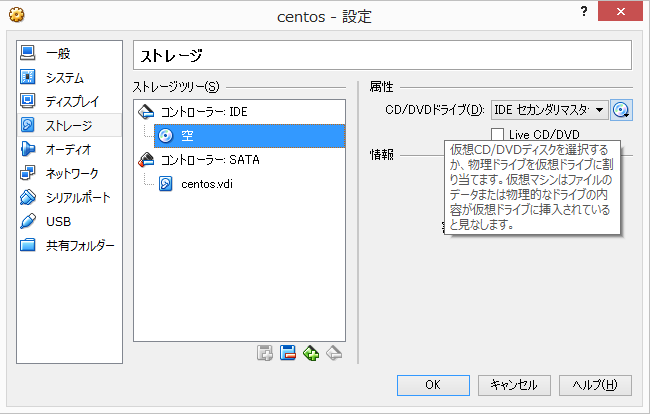
ストレージを選択し、コントローラー:IDE下の「空」を選択。
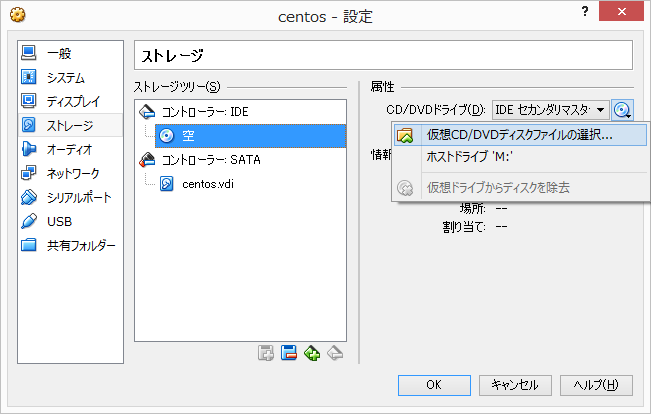
右側のCD/DVDドライブ横のディスクアイコンをクリックし、仮想CD/DVDディスクファイルを選択...をクリック。
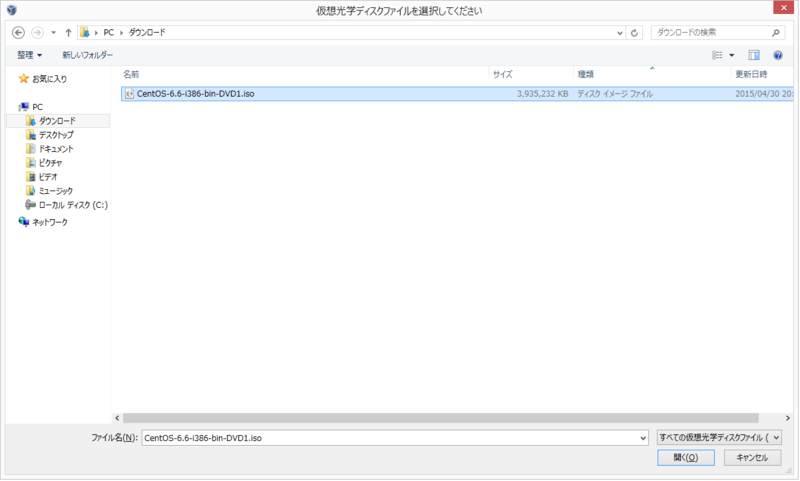
「仮想光学ディスクファイルを選択してください」ダイアログからダウンロードした「CentOS-6.6-i386-bin-DVD1.iso」を選択し、開く(O)をクリック。
OKをクリックしダイアログを閉じる。
■CentOSインストール
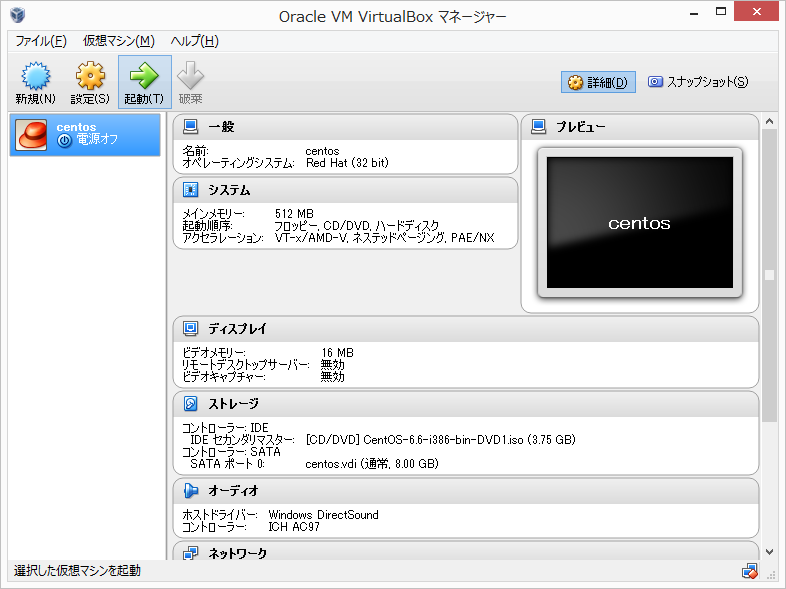
「Oracle VM VirtualBox マネージャー」ウィンドウの左側から作成したcentosを選択し、起動(T)アイコンをクリック。
別ウィンドウで仮想マシンが起動。
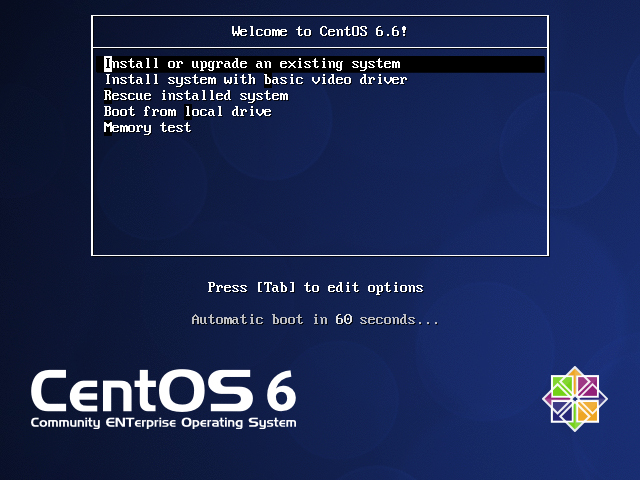
・Install or upgrade an existing system (Default)(Iで選択可)を選択し、ENTER。
・Install system with basic video driver (B)
・Resucue installed system (R)
・Boot from local drive (L)
・Memory test (M)
※ 初期設定画面はキーボード操作。
※ マウス入力がVirtualBoxに占有されてしまう為、Windows(HostOS)側の操作をするには右Controlキーを押す。
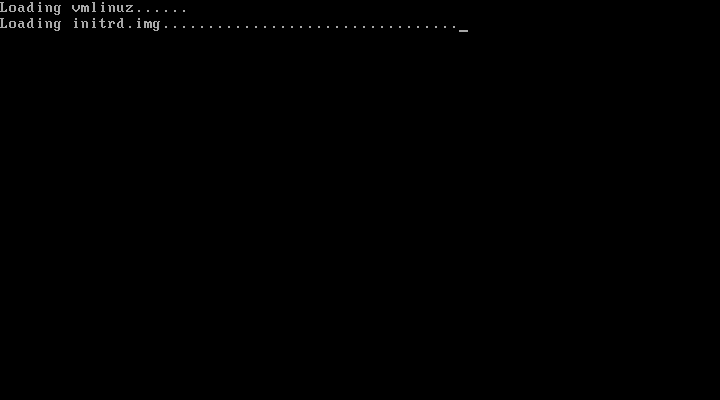
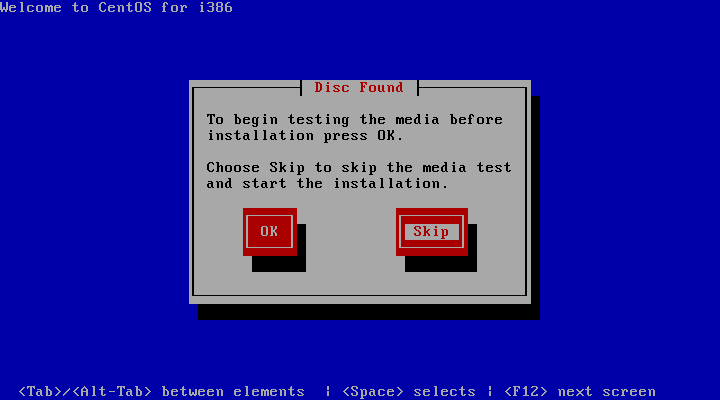
ターミナル画面の後、インストールディスクのチェックを行うか聞かれる。
ディスクチェックを行ったほうが安全と思われるが、それなりに時間がかかるのでここでは Skip を選択。
※ TABで選択、SPACEで決定
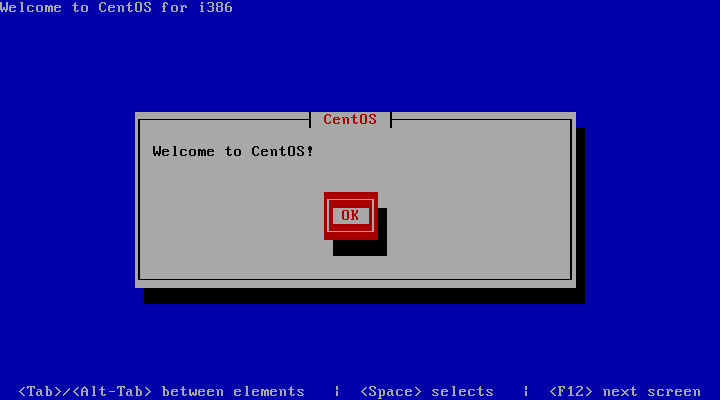
Welcome to CentOS!
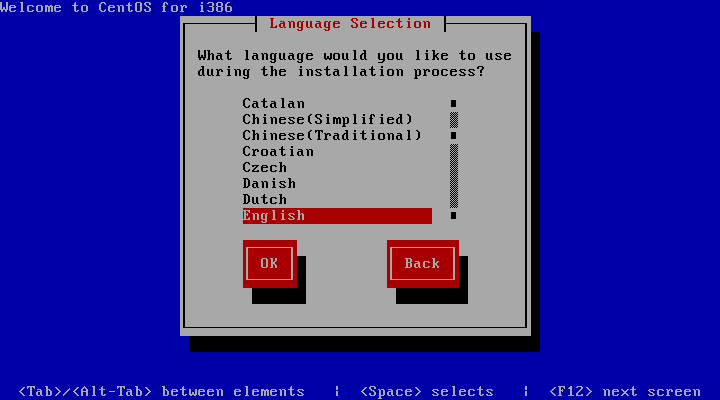
インストール中の表示言語を選択:English を選択。(Default)
テキストモードインストールでは日本語表示は利用できない。
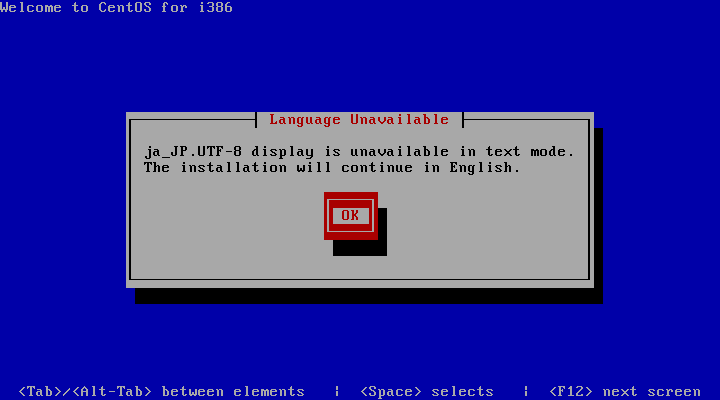
Japaneseを選択した場合、強制的に英語になる。
※ ただしJapaneseを選択しておくと、後の設定のDefaultが日本仕様になる。
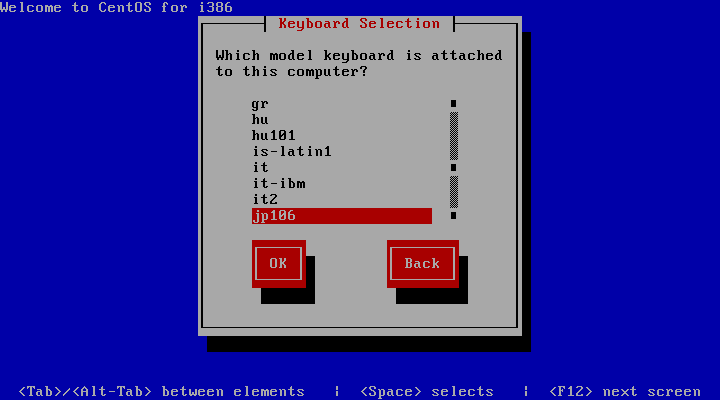
キーボードレイアウト:jp106 を選択。(Default)
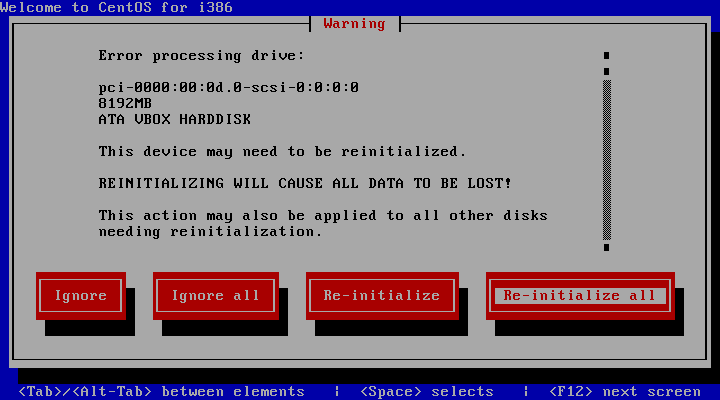
ハードディスクの初期化:
初期化すると全てのデータが削除されるがいいか尋ねられる。
今回は新規インストールなので、 Re-initialize all を選択。
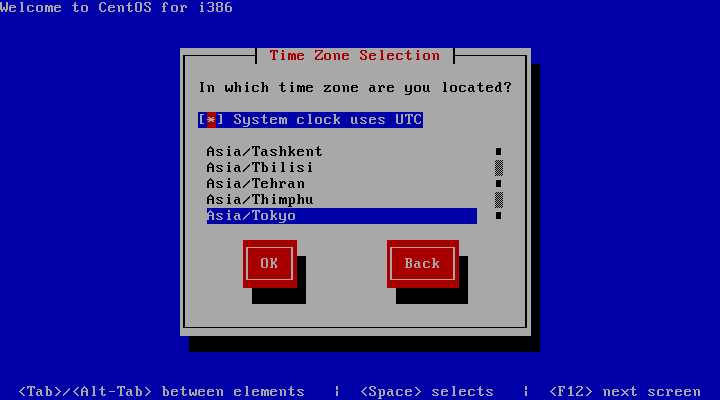
タイムゾーンの選択:
・Systemclock uses UTC
システム内部の時計に協定世界時を使用する。
実マシン上に別OSをインストールしている場合は合わせた方がよいらしいが、
仮想マシンなのでここはそのままUTCを使用する。
・"Asia/Tokyo"を選択
※ 参考:9.8 タイムゾーンの設定
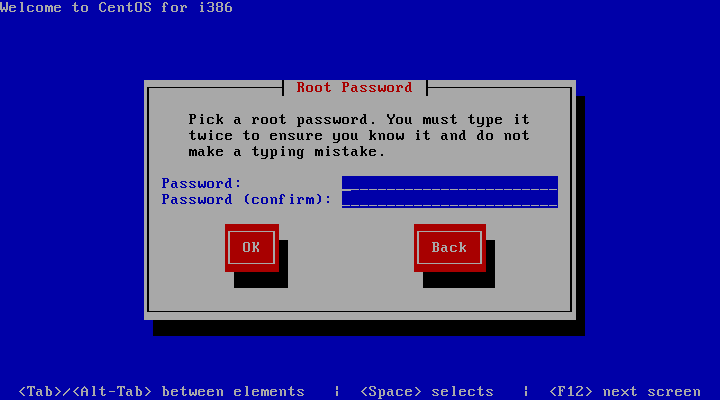
root パスワードの設定:
上下に同じパスワードを入力する。(下は確認用)
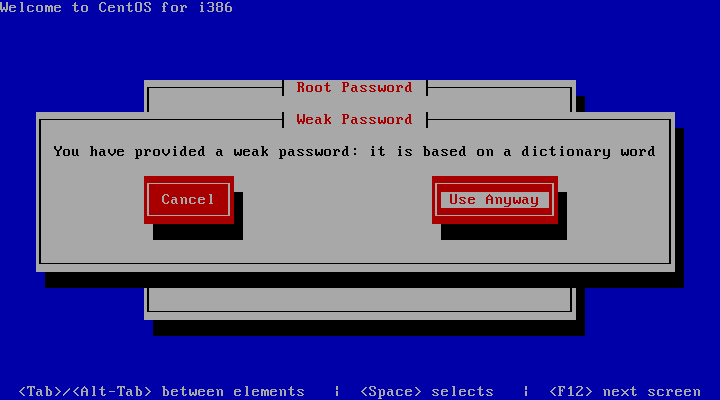
簡単なパスワードを入力すると注意されるが Use Anyway を選択すれば使用は可能。
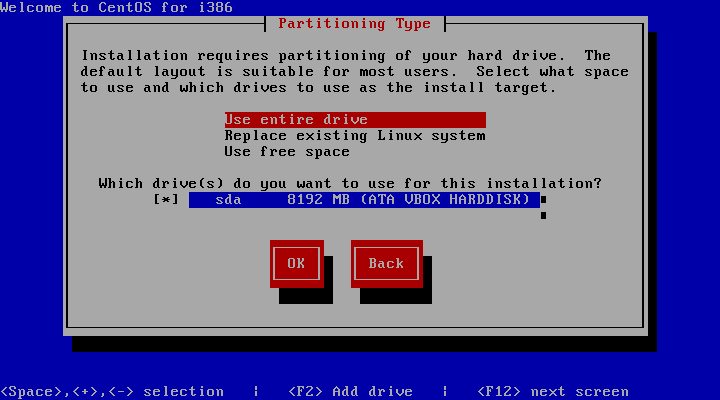
Use entire drive (すべての領域を使用)選択。(Default:Replace existing Linux System)
下はインストールするドライブ。今回は仮想マシン作成で設定した8GBのドライブ1台のみが表示されている。
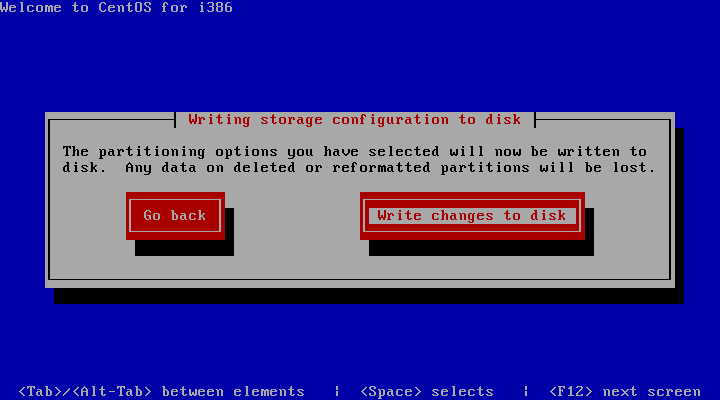
Write stotage configration to disk
指定した構成をディスクに書き込んでいいか尋ねられるので、いいなら Write changes to disk を選択すればディスクの初期化とパッケージのインストールが開始される。
(Go back を選択すれば再設定可能)
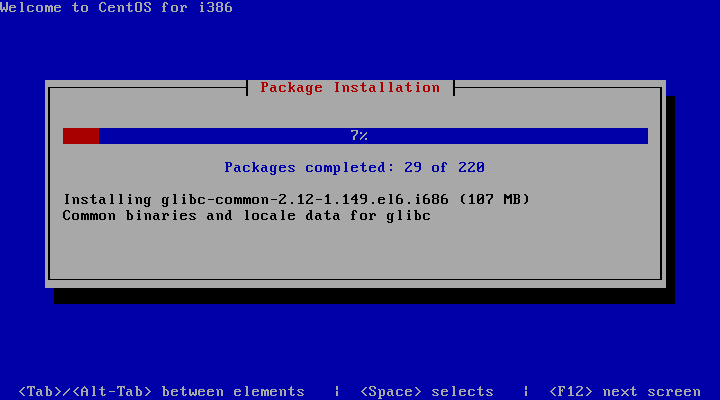
パッケージのインストール中...
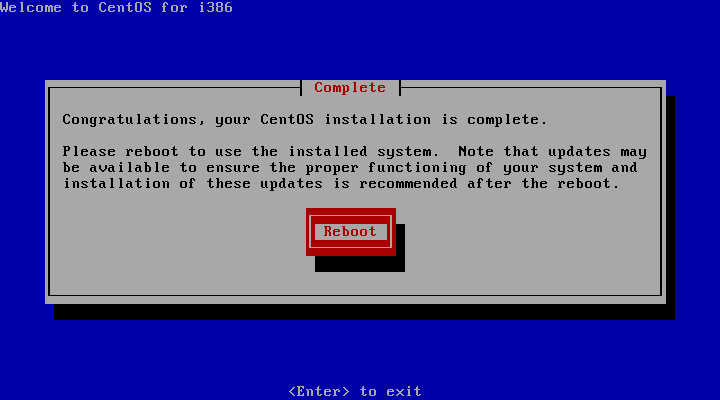
Complete
上記表示がされれば、パッケージインストール完了。ENTERで再起動。
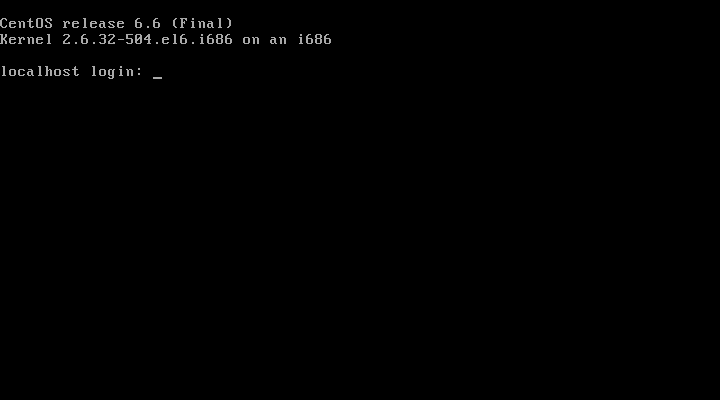
ログイン名:root
パスワード:インストール時に設定したパスワード
以上で最小構成でのインストールが完了。

はじめてのVirtualBox―オープンソースの「仮想化ツール」の使い方を詳細解説! (I・O BOOKS)
- 作者: 清水美樹
- 出版社/メーカー: 工学社
- 発売日: 2012/07
- メディア: 単行本
- クリック: 5回
- この商品を含むブログ (3件) を見る

CentOS 6徹底活用ガイド―インターネットOSを最強アプリで使いこなそう!
- 作者: 恒川裕康
- 出版社/メーカー: 秀和システム
- 発売日: 2012/12/01
- メディア: 単行本
- この商品を含むブログを見る
VirtualBox:Install
VirtualBox Download
https://www.virtualbox.org/wiki/Downloads
ダウンロードページから以下の2つをダウンロード
VirtualBox 4.3.26 for Windows hosts (x86/amd64をクリック)
VirtualBox 4.3.26 Oracle VM VirtualBox Extension Pack (All supported platformsをクリック)
■VirtualBoxをインストール
Welcome to the Oracle VM VirtualBox 4.3.26 Setup Wizard

Next>をクリック。
Custom Setup

・VirtualBox Application
・VirtualBox USB Support
・VirtualBox Networking
・VirtualBox Bridge Networking
・VirtualBox Host-Only Networking
・VirtualBox Python 2.x Support
Location: C:\Program Files\Oracle\VirtualBox\
Defaultですべて選択状態なので、そのまま Next> をクリック。

・Create a shortcut on the desktop
・Create a shortcut in the Quick Launch Bar
・Register file associations
好みに応じて選択して Next> をクリック。

Warning:
Network Interfaces
VirtualBoxのネットワーク機能をインストールするために、一時的にネットワークが切れるがいいか尋ねてくるので、よければ Yes をクリック。
Ready to Install

Install をクリックしてインストール開始。
※ ユーザーアカウント制御のダイアログが表示されたら はい(Y) をクリック。

インストール中...

Oracle VM VirtualBox 4.3.26 installation is complate
・Start Oracle VM VirtualBox 4.3.26 after installation
インストール後すぐにVirtualBoxを起動したければチェックして Finish をクリック。

VirtualBox起動。
■VirtualBoxに機能拡張パッケージをインストール
VirtualBoxでUSB2.0等を利用可能にする機能拡張パッケージをインストールする。

ファイル(F)メニューから、環境設定(P)...をクリック。

左側にある機能拡張を選択。
右側の水色のアイコン(パッケージを追加)をクリック。

「機能拡張パッケージを選択」ダイアログからダウンロードした「Oracle_VM_VirtualBox_Extension_Pack-4.3.26-98988.vbox-extpack」を選択し、開くをクリック。
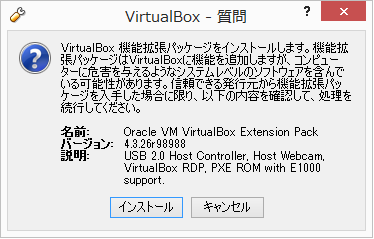
「VirtualBox - 質問」ダイアログの内容を確認し、インストールをクリック。

「VirtualBox ライセンス」ダイアログの内容を最後まで確認(スクロール)し、同意できれば 同意します(A) をクリック。
「ユーザー アカウント制御」ダイアログが表示されたら、はいをクリック。

「VirtualBox - 情報」ダイアログで「インストールに成功しました」と表示されたらOKをクリック。

VirtualBoxのインストール完了。

はじめてのVirtualBox―オープンソースの「仮想化ツール」の使い方を詳細解説! (I・O BOOKS)
- 作者: 清水美樹
- 出版社/メーカー: 工学社
- 発売日: 2012/07
- メディア: 単行本
- クリック: 5回
- この商品を含むブログ (3件) を見る
Vagrant:プロビジョニング (Chef)
サーバ自動構成ツール:Chefを使用したVagrantによる環境構築
Chefを使用するとシェルスクリプトよりも簡単かつ詳細に構成できるようだ。
実行環境
HOST OS:Windows 7 Professional
RAM:2GB
GUEST OS:CentOS 6.6
Chef用の設定ファイル"Cookbook"が多数公開されている為、これを利用し簡単に設定作業を効率化できる。
The resource for Chef cookbooks - Chef Supermarket
vagrant用プラグイン"vagrant-omnibus"を使用すると、vagrantからchefによる自動構成を設定できる。
chef/vagrant-omnibus
https://github.com/schisamo/vagrant-omnibus/
今回は上記の”Chef Supermarket”のCookbookを使ってApache2をインストールする。
apache2 Cookbook - Chef Supermarket
https://supermarket.chef.io/cookbooks/apache2
Cookbookをダウンロードしたら、vagrantfileのあるフォルダに"cookbooks"フォルダを作成し、その中に解凍してできたapache2フォルダを移動する。
vagrantfileにインストールするchefのバージョンを指定
※ :lastest で最新バージョンを指定可能
config.omnibus.chef_version = :latest
config.vm.provision "chef_solo" do |chef|
chef.cookbooks_path = "c:/vagrant/CentOS 6.6/cookbooks"
chef.add_recipe "apache2"
# You may also specify custom JSON attributes:
chef.json = {
:apache2 => {
:node['platform_family'] => 'rhel',
:node['platform'] => 'centos'
}
}
end
これで、Chefによる自動構成はできるが、iptablesが設定されないため、HostOSからアクセスができない。

- 作者: Mitchell Hashimoto,Sky株式会社玉川竜司
- 出版社/メーカー: オライリージャパン
- 発売日: 2014/02/21
- メディア: 単行本(ソフトカバー)
- この商品を含むブログ (9件) を見る

入門Chef Solo - Infrastructure as Code
- 作者: 伊藤直也
- 出版社/メーカー: 伊藤直也
- 発売日: 2013/03/11
- メディア: Kindle版
- 購入: 16人 クリック: 1,027回
- この商品を含むブログ (19件) を見る
Vagrant:プロビジョニング
Vagrantのプロビジョニング機能により、GuestOS内にアプリケーションを自動インストールする。
実行環境
HOST OS:Windows 7 Professional
RAM:2GB
GUEST OS:CentOS 6.6
プロビジョニングを利用するには、まずGuestOS上で実行される自動インストール用のシェルスクリプトを用意する。ここではファイル名”bootstrap.sh”として以下の内容を記述しvagrantfileと同じフォルダに保存し、Apacheをインストールした。
echo "/*-------- vagrant install script --------*/"
# install Apache HTTP Server
yum install -y httpd
# Apache HTTP Server Restart
/etc/init.d/httpd restart
# iptables accept port 80(HTTP)
iptables -I INPUT 5 -m state --state NEW -p tcp --dport 80 -j ACCEPT
# iptables save & restart
/etc/init.d/iptables save
※ http(port:80)の許可は、初期状態のiptablesのssh(port:22)の下に決め打ちで挿入している為、環境によりエラーとなる可能性があるかもしれない。
作成したシェルスクリプトファイルを利用するようにvagrantfileに以下の設定を追加する。
72: config.vm.provision "shell", path: "bootstrap.sh"
また、HostOSからApacheの動作を確認用に25行目あたりにあるポートフォワードの設定をアンコメントして有効にした。
25: config.vm.network "forwarded_port", guest: 80, host: 8080
HostOS上のブラウザから、localhost:8080へアクセスして "Apache 2 Test Page" が表示されれば成功。
追記
vagrantfile内に直接記述することも可能。67行目~70行目までアンコメントし、
SHELL~SHELL間に設定内容を記述する。
67: config.vm.provision "shell", inline: <<-SHELL
68: echo "#### vagrant install inline script ####"
69: echo "#### install Apache HTTP Server ####"
70: yum install -y httpd
71: echo "#### Apache HTTP Service Restert ####"
72: /etc/init.d/httpd restart
73:
74: echo "#### iptables accept port 80(HTTP) ####"
75: iptables -I INPUT 5 -m state --state NEW -p tcp --dport 80 -j ACCEPT
76:
77: echo "#### iptables accept port 80(HTTP) save ####"
78: /etc/init.d/iptables save
79:
80: echo "#### iptables restart ####"
81: /etc/init.d/iptables restart
82:
83: SHELL

- 作者: Mitchell Hashimoto,Sky株式会社玉川竜司
- 出版社/メーカー: オライリージャパン
- 発売日: 2014/02/21
- メディア: 単行本(ソフトカバー)
- この商品を含むブログ (9件) を見る
Vagrant:Host OS と Guest OS 間でファイル共有
Host OS と Guest OS 間でファイル共有
実行環境
HOST OS:Windows 7 Professional
RAM:2GB
GUEST OS:CentOS 6.6
現在の状況
同期フォルダーはvagrantfileに以下の設定を記述している。
default: /vagrant => C:/vagrant/CentOS 6.6
The following SSH command responded with a non-zero exit status.
Vagrant assumes that this means the command failed!
mkdir -p /vagrant
Stdout from the command:
Stderr from the command:
sudo: sudo ■■■■■■■■■■■■■■■■■■■■ tty ■■■■■■■■■■■■■■■■■■■■■■■■■■■■■■■■■■■■■■■■■■■■■■■■
sudoでエラーが出ているようなので、visudoで以下の設定をして再起動。
Defaults: !requiretty
==> default: Mounting shared folders...
default: /vagrant => C:/vagrant/CentOS 6.6
The following SSH command responded with a non-zero exit status.
Vagrant assumes that this means the command failed!
mkdir -p /vagrant
Stdout from the command:
Stderr from the command:
sudo: ■■■■■■ (tty) ■■■■■■■■■■■■■■■■■■■■■■■■■■■■■■■■■■■■■■■■■■■■■ (askpass) ■■■■■■■■■■■■■■■■■■■■■■■■■■■■■■■■■■■■■■■■■■■■■■
さらに以下の設定を追加して再起動
ALL=(ALL) NOPASSWD:ALL
Bringing machine 'default' up with 'virtualbox' provider...
==> default: Importing base box 'CentOS 6.6'...
==> default: Matching MAC address for NAT networking...
==> default: Setting the name of the VM: CentOS66_default_1429857936135_93663
==> default: Clearing any previously set network interfaces...
==> default: Preparing network interfaces based on configuration...
default: Adapter 1: nat
==> default: Forwarding ports...
default: 22 => 2222 (adapter 1)
==> default: Running 'pre-boot' VM customizations...
==> default: Booting VM...
==> default: Waiting for machine to boot. This may take a few minutes...
default: SSH address: 127.0.0.1:2222
default: SSH username: vagrant
default: SSH auth method: private key
default: Warning: Connection timeout. Retrying...
default: Warning: Connection timeout. Retrying...
default: Warning: Remote connection disconnect. Retrying...
==> default: Machine booted and ready!
==> default: Checking for guest additions in VM...
==> default: Mounting shared folders...
default: /vagrant => C:/vagrant/CentOS 6.6
以上の設定をvagrantユーザーにのみ適用するように上記設定は元に戻し、下記設定を最終行に追加。
これでフォルダの同期が可能になった。

- 作者: Mitchell Hashimoto,Sky株式会社玉川竜司
- 出版社/メーカー: オライリージャパン
- 発売日: 2014/02/21
- メディア: 単行本(ソフトカバー)
- この商品を含むブログ (9件) を見る
Vagrant:Host OS と Guest OS 間でSSH接続
vagrantでGuestOSを起動時に vagrant ssh コマンドでssh接続するように設定をする。
実行環境は以下。
HOST OS:Windows 7 Professional
RAM:2GB
GUEST OS:CentOS 6.6
vagrant ssh コマンドで自動ログインするユーザーを登録。
Defaultのユーザー名はvagrantとなっているがvagrantfileの設定で変更も可能。
8行目のVagrant.configure(2) do |config|から最終行のendの間に記述。
下記の例では最下行のend直前にユーザー名login_nameとして設定した。
GuestOS内でssh鍵をpassphraseは無しで作成。
※ passphraseを設定すると、認証エラーとなる。
ssh公開鍵をauthorized_keysとして登録
vargrant upコマンドで起動後、tera termで接続(127.0.0.1:2222、ユーザー名:vagrant、パスワード:vargrant)してファイルメニューから"SSH SCP..."コマンドでHostOSへコピーした。
これで、vagrant起動時にssh接続のエラー表示がされなくなった。
C:\vagrant\CentOS 6.6>vagrant up
Bringing machine 'default' up with 'virtualbox' provider...
==> default: Clearing any previously set forwarded ports...
==> default: Clearing any previously set network interfaces...
==> default: Preparing network interfaces based on configuration...
default: Adapter 1: nat
==> default: Forwarding ports...
default: 22 => 2222 (adapter 1)
==> default: Running 'pre-boot' VM customizations...
==> default: Booting VM...
==> default: Waiting for machine to boot. This may take a few minutes...
default: SSH address: 127.0.0.1:2222
default: SSH username: vagrant
default: SSH auth method: private key
default: Warning: Connection timeout. Retrying...
default: Warning: Connection timeout. Retrying...
default: Warning: Remote connection disconnect. Retrying...
==> default: Machine booted and ready!
==> default: Checking for guest additions in VM...
==> default: Mounting shared folders...
default: /vagrant => C:/vagrant/CentOS 6.6
The following SSH command responded with a non-zero exit status.
Vagrant assumes that this means the command failed!
mkdir -p /vagrant
今度は同期フォルダにエラーが出ているようだ。

- 作者: Mitchell Hashimoto,Sky株式会社玉川竜司
- 出版社/メーカー: オライリージャパン
- 発売日: 2014/02/21
- メディア: 単行本(ソフトカバー)
- この商品を含むブログ (9件) を見る
Vagrant:VirtualBoxのディスクファイルからVagrantファイルへ変換
以下の非公式日本語ドキュメントを参考にVirtualBoxファイルをVagrantファイルに変換する。
Vagrant日本語ドキュメント
http://lab.raqda.com/vagrant/index.html
実行環境は以下。
HOST OS:Windows 7 Professional
RAM:2GB
GUEST OS:CentOS 6.6
まずはVirtualBoxにCentOSをインストールする。
登録名は"CentOS 6.6”とした。
インストール完了後、下記コマンドを実行。
--base VirtualBox上に表示されている登録名
--output 出力ファイル名
※ 名前にスペースが入っている場合は上記のように""で囲む。
vagrantにboxを登録し初期化する。
既にvagrantfileが存在した場合は、エラーとなる。
boxファイルごとにディレクトリを用意する必要があるようだ。
改めて、CentOS 6.6用の環境フォルダとしてC:/vagrant下に"CentOS 6.6"ディレクトリを作成後カレントディレクトリとしてVagrant初期化。
vagrantfileが作成されたら、登録をチェック。
起動はするがと以下のように認証エラー表示がされた。
default: SSH address: 127.0.0.1:2222
default: SSH username: vagrant
default: SSH auth method: private key
default: Warning: Authentication failure. Retrying...
default: Warning: Authentication failure. Retrying...
GuestOSにvagrantユーザーを登録してなければいけない?

- 作者: Mitchell Hashimoto,Sky株式会社玉川竜司
- 出版社/メーカー: オライリージャパン
- 発売日: 2014/02/21
- メディア: 単行本(ソフトカバー)
- この商品を含むブログ (9件) を見る

